
Why Clean Evaporator Coils Matter for Your Home
HVAC evaporator coil cleaning is essential maintenance that directly impacts your cooling system’s efficiency and your monthly energy bills. Here’s what you need to know:
Quick Answer: How to Clean HVAC Evaporator Coils
- Turn off power at the circuit breaker
- Access the coil by removing the air handler panel
- Brush away loose debris with a soft brush and vacuum
- Apply no-rinse coil cleaner and let it foam
- Clean the drain pan and check the drain line
- Reassemble and restore power
Your evaporator coil is the heart of your air conditioning system. When it’s dirty, your AC works harder, runs longer, and costs you more money. Studies show that regular AC maintenance can improve efficiency by up to 30%, and coil cleaning alone can deliver 16% efficiency gains. That translates to real savings on your utility bills.
But dirty coils don’t just waste energy. They restrict airflow, reduce cooling capacity, and can even lead to frozen coils or complete system breakdowns. The good news? With basic tools and about an hour of your time, you can clean your evaporator coils yourself and restore your system’s performance.
I’m Tyler Steiner, CEO and Founder of Prime Heating & Cooling, and I’ve spent over a decade helping New England homeowners maintain efficient HVAC systems. Throughout my career, I’ve seen how regular HVAC evaporator coil cleaning prevents costly repairs and keeps systems running at peak performance. Let me walk you through exactly how to do it right.
, increased energy consumption (higher bills), ice buildup on coils (system strain), reduced cooling capacity (poor comfort), and potential system failure (expensive repairs). Clean coils restore optimal heat transfer, proper airflow, efficient operation, lower energy costs, and extended system life. - HVAC evaporator coil cleaning infographic")
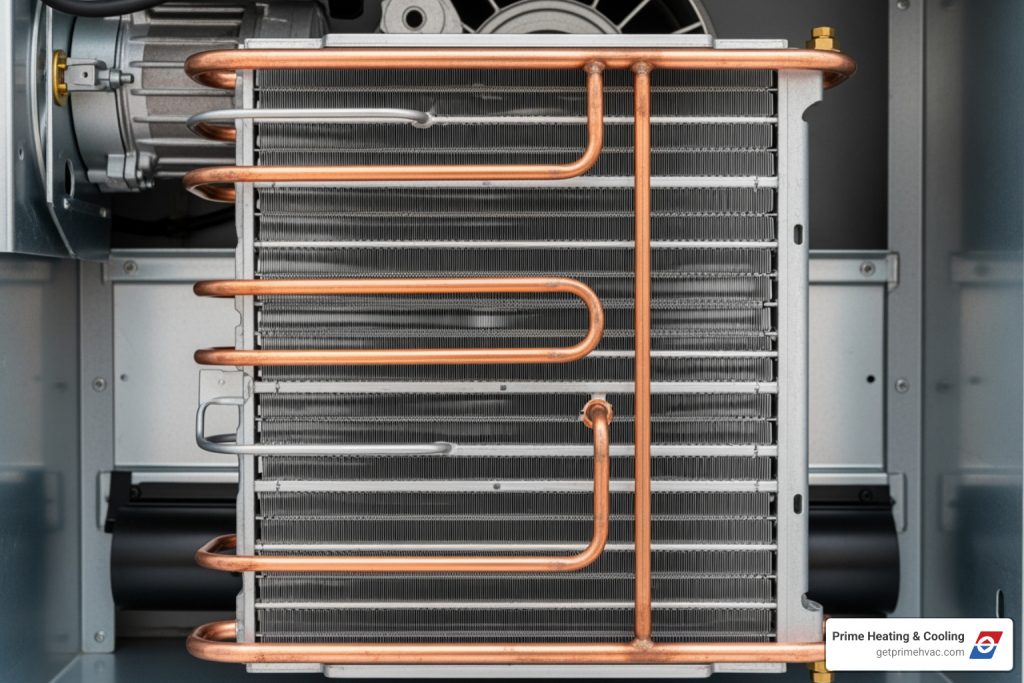
Understanding Your Evaporator Coils

Imagine your air conditioner as a hardworking team, and the evaporator coil is its star player. Located within your indoor air handler or furnace cabinet, these coils are the unsung heroes of your cooling system. Their primary job is to extract heat and moisture from the air circulating through your Rhode Island or Massachusetts home.
Here’s how this magic happens:
- Heat Exchange Process: As warm, humid air from your home passes over the cool evaporator coils, the refrigerant inside absorbs the heat. This process cools the air before it’s recirculated back into your living space.
- Refrigerant Role: The refrigerant, a special fluid, plays a crucial part. It enters the evaporator coil as a cool liquid, absorbs the heat from your indoor air, and then transforms into a warm gas. This gas then travels to your outdoor unit (the condenser) to release the heat.
- Dehumidification Function: As the warm, humid air meets the cold surface of the evaporator coil, moisture in the air condenses, much like water droplets forming on a cold glass on a hot summer day. This condensed water drips into a drain pan and is then channeled away, effectively dehumidifying your home. This is especially important during those sticky New England summers!
So, how do these vital components get dirty? Over time, the air circulating through your home carries more than just comfort. It also carries dust, pollen, pet dander, and other airborne particles. While your air filter catches a lot of this, some inevitably slips through and accumulates on the moist surface of the evaporator coils. This buildup can turn your sparkling coils into a grimy mess.
The consequences of these dirty coils can be quite significant:
- Reduced Airflow: A layer of grime acts like a blanket, obstructing the air from passing freely over the coils. This forces your system to work harder to push air through.
- Higher Energy Consumption: When airflow is restricted and heat transfer is hindered, your AC has to run longer and consume more electricity to reach and maintain your desired temperature.
- Frozen Coils: This is a common and problematic symptom of dirty coils. Restricted airflow means the refrigerant doesn’t absorb enough heat and remains too cold. This can cause the moisture on the coils to freeze, leading to a block of ice that further obstructs airflow and can damage your system. It’s like your AC is giving itself an ice pack, but not in a good way!
- System Strain: All these issues put undue stress on your HVAC system’s components, particularly the compressor, leading to increased wear and tear and potentially shortening its lifespan.
Why Dirty Coils Cost You Money
We’re all looking for ways to save a few bucks, especially on utility bills. And when it comes to your HVAC system, clean coils are a secret weapon. Dirty coils are simply inefficient. They can’t absorb heat as effectively, meaning your AC has to run constantly to try and cool your space. This isn’t just annoying; it’s expensive.
The reduction in heat absorption leads to an inefficient cooling process, causing the system to work harder to achieve the desired indoor temperature. As a result, the air conditioner must consume more energy to do its job, leading to higher utility bills. This constant struggle also leads to increased wear and tear on components, raising the potential for costly repairs down the line. A compressor, for instance, can face premature failure if continually stressed by dirty coils and restricted airflow. This can eventually lead to premature system failure, forcing you to replace your entire unit sooner than expected.
Evaporator Coils vs. Condenser Coils
While both coils are critical to your AC’s operation, they have distinct roles and locations. Understanding the difference is key to proper maintenance.
- Location Difference: Your evaporator coil is the indoor component, typically housed within your furnace or air handler. The condenser coil, on the other hand, is part of your outdoor AC unit, exposed to the elements.
- Function Difference: The evaporator coil’s job is to absorb heat from your indoor air. Think of it as the heat sponge of your system. The condenser coil’s job is to release that absorbed heat into the outdoor air. It’s the heat radiator.
- Cleaning Method Differences: Because of their different locations and functions, their cleaning needs vary. Evaporator coils deal primarily with indoor airborne particles and moisture, often requiring a no-rinse chemical cleaner. Condenser coils, being outdoors, collect leaves, grass clippings, dust, and other environmental debris. They can often be cleaned more aggressively with water and a brush, though never with a high-pressure washer, as that can damage the delicate fins. For evaporator coils, water usage must be controlled to prevent drain pan overflow and potential water damage to your home.
When and How Often to Clean Your Coils
When it comes to HVAC evaporator coil cleaning, timing is everything. We recommend making it an annual tradition, ideally as part of your spring cleaning routine, before the cooling season kicks into high gear. This ensures your system is ready to tackle the summer heat efficiently from day one.
But how do you know if your coils need a little extra love? Here are some signs that your evaporator coil might be crying out for a clean:
- Reduced Cooling Performance: If your AC isn’t cooling your home as effectively as it used to, or it takes longer to reach the set temperature, dirty coils are a likely culprit.
- Musty Odors: The combination of moisture and trapped debris on the coils can create a breeding ground for mold and mildew, leading to unpleasant, musty smells circulating through your home. Yuck!
- Visible Dirt or Ice: If you can safely access your coils and see a layer of dust, grime, or even ice buildup, it’s definitely time for a cleaning. Ice on the coils is a serious sign of restricted airflow or other issues.
- Increased Energy Bills: A sudden spike in your electricity bill without a corresponding increase in usage could indicate your AC is working overtime due to dirty coils.
Several factors can influence how frequently your coils get dirty, and thus, how often you might need to clean them:
- Pets: Our furry friends shed dander, which contributes significantly to coil buildup.
- Smokers: Smoke residue can create a sticky film on coils, attracting more dirt.
- High Pollen Areas: If you live in an area with a lot of trees or plants, pollen will find its way into your system.
- Dusty Environments: Homes near construction sites or those with frequent foot traffic might accumulate dust faster.
The Importance of Air Filters
Think of your air filter as the bouncer for your HVAC system – it’s the first line of defense, keeping unwanted guests (dust, dirt, allergens) from reaching your delicate evaporator coils. A clean air filter is paramount to maintaining clean coils. When a filter becomes clogged, it can’t do its job effectively, allowing more debris to pass through and settle on your evaporator coils.
We can’t stress this enough: changing your air filter regularly is one of the simplest and most impactful maintenance tasks you can perform. It can help improve your energy efficiency by 5% to 15%. For most homes in Rhode Island and Massachusetts, we recommend changing your air filter every 1-3 months, depending on factors like pets, allergies, and local air quality.
When choosing filters, you’ll often see a MERV rating (Minimum Efficiency Reporting Value). This rating indicates how effectively a filter captures airborne particles. Higher MERV ratings (e.g., MERV 8-11 for residential use) offer better filtration, but it’s important to ensure your HVAC system can handle the increased airflow resistance. If you’re unsure, check your system’s manual or consult with us. A good filter system can significantly reduce the need for deep evaporator coil cleaning, as it catches most of the debris before it ever reaches the coils.
The Step-by-Step Guide to HVAC Evaporator Coil Cleaning

Now for the fun part: getting those coils sparkling! While HVAC evaporator coil cleaning is a task many homeowners can tackle themselves, it’s important to know the line between DIY and professional help.
For routine cleaning of light dust and grime, a DIY approach is often sufficient and can save you money. However, there are times when it’s best to call in the pros, like us at Prime Heating & Cooling:
- Significant Mold: If you find extensive mold growth on your coils or in the drain pan, it requires specialized treatment with EPA-registered biocides and professional containment to prevent spores from spreading.
- Difficult Access: Some evaporator coils are located in tight, hard-to-reach spaces that require specialized tools or partial disassembly of the unit. Don’t force it – you could cause damage.
- Refrigerant Issues: If you suspect a refrigerant leak (e.g., you notice a hissing sound, or the AC isn’t cooling at all), this is a job for a certified HVAC technician. Handling refrigerant requires specific training and equipment.
- System Malfunctions: If your system is experiencing persistent issues like frequent freezing, unusual noises, or complete breakdowns, a professional diagnosis is needed before attempting any cleaning.
Essential Tools and Materials for HVAC Evaporator Coil Cleaning
Before we dive in, gather your supplies. Think of it as assembling your cleaning dream team:
- No-rinse evaporator coil cleaner: This is specifically designed for coils and often contains a foaming agent that lifts dirt and then dissipates with the condensate, no rinsing required.
- Soft bristle brush: For gently sweeping away loose debris.
- Shop vacuum with a soft brush attachment: Great for suctioning away dust without damaging fins.
- Screwdriver or nut driver set: To remove access panels.
- Gloves: To protect your hands from chemicals and sharp coil fins.
- Safety glasses: Essential for eye protection when working with chemicals or dislodging debris.
- Optional: Fin comb (to gently straighten bent fins), small spray bottle with water (for rinsing if using a mild detergent).
The Cleaning Process
Let’s get those coils sparkling! Follow these steps carefully:
- Turn Off Power: This is non-negotiable for your safety. Locate your indoor air handler unit and turn off the power at the main switch, usually found on the unit itself, and then at your home’s circuit breaker. We want no surprises, just clean coils!
- Locate the Evaporator Coil: Your evaporator coil is typically housed within your furnace or air handler unit. It’s usually found in a rectangular metal box that has an access panel.
- Remove Access Panel: Using your screwdriver or nut driver, carefully remove the screws securing the access panel that covers the evaporator coil. Some units may have metal reflective tape sealing the seams – gently peel this away. Take a picture as you go, so you remember how everything goes back together.
- Gentle Dry Cleaning with Brush and Vacuum: Before applying any liquid, use your soft bristle brush to gently sweep away any loose dust, pet hair, or debris from the coil surface. Follow up with your shop vacuum (with a brush attachment) to suction away as much dry particulate as possible. Be extremely gentle, as the coil fins are delicate and easily bent.
- Apply Coil Cleaner: Now, don’t be shy! Following the instructions on your no-rinse evaporator coil cleaner can, liberally spray the entire surface of the evaporator coil. The cleaner will typically foam up, penetrating the grime. Allow it to sit for the recommended dwell time (usually 10-15 minutes). The beauty of “no-rinse” cleaner is that it’s designed to be rinsed away by the condensation your AC produces when it’s running.
- Clean the Condensate Drain Pan: While the cleaner is working its magic on the coils, take a moment to inspect the drain pan located directly beneath the coils. Remove any standing water, debris, or sludge. A 50/50 mix of bleach and water can treat minor mold or algae contamination in the pan.
- Check the Condensate Drain Line: Ensure the drain line (a PVC pipe extending from the pan) isn’t clogged. You can carefully pour a cup of water into the pan to see if it drains freely. If it’s backed up, a professional might be needed to clear it, as a clogged line can lead to water leaks and potential damage.
- Reassemble and Restore Power: Once the cleaner has had time to work, and if you used a no-rinse formula, you’re ready to reassemble. Secure the access panel back in place with its screws, and reapply any reflective tape you removed. Finally, return to your circuit breaker and restore power to your HVAC system. Turn on your AC, and let the condensation rinse away the cleaner and dissolved grime.
Safety First: Precautions for HVAC Evaporator Coil Cleaning
Your safety is our top priority. While HVAC evaporator coil cleaning is a manageable DIY project, it’s crucial to follow these safety precautions:
- Turning Off Power at the Circuit Breaker: We can’t emphasize this enough. Always, always, always ensure the power to your HVAC unit is completely off at the circuit breaker before you touch anything. This prevents accidental startup and reduces the risk of electrical shock.
- Handling Chemical Cleaners: Wear protective gloves and safety glasses when using any chemical coil cleaner. Read the product label carefully for specific instructions, dilution ratios, and warnings. Ensure the area is well-ventilated to avoid inhaling fumes.
- Protecting Electrical Components from Moisture: While the evaporator coil is designed to handle moisture, nearby electrical components are not. Be careful not to splash water or cleaner onto wiring, relays, or other electrical parts.
- Avoiding Damage to Delicate Coil Fins: The aluminum fins on your evaporator coil are very thin and can bend easily. Use a soft brush and gentle pressure. If you have a fin comb, use it carefully to straighten any bent fins, as bent fins can impede airflow.
- Proper Ventilation: When applying chemical cleaners, ensure you have adequate ventilation in the area. Open windows or use a fan if necessary to disperse fumes.
Frequently Asked Questions about Evaporator Coil Cleaning
We hear a lot of questions about evaporator coil cleaning, and we’re happy to clear things up!
How much does it cost to have evaporator coils cleaned professionally?
The cost for professional HVAC evaporator coil cleaning can vary based on several factors, including the accessibility of your unit, the severity of the dirt buildup, and regional pricing here in Rhode Island and Massachusetts. For a thorough cleaning that might involve more complex access or even dealing with refrigerant (which we strongly advise only certified technicians do), costs can range. Some of our research suggests that a comprehensive cleaning, especially if it requires a pump-down and recharge of the system, costing around $250, might not be considered outrageous given the labor and expertise involved.
When is it worth the price? If you’re uncomfortable with the DIY process, if your coils are extremely dirty or show signs of mold, or if your system has complex issues that might be related to the coils, investing in professional service from us at Prime Heating & Cooling is a smart move. It ensures the job is done correctly and safely, often coming with a warranty for the work.
Can I use bleach or other household cleaners on my evaporator coils?
While it might be tempting to grab whatever cleaner you have under the sink, we strongly advise against using bleach or harsh household cleaners on your evaporator coils.
- Risks of Improper Chemicals: Many household cleaners are acidic or highly alkaline, which can corrode the delicate aluminum fins and copper tubing of your evaporator coil. This damage can lead to refrigerant leaks, costly repairs, and even shorten the lifespan of your entire HVAC system.
- Damage to Aluminum Fins: Bleach, for example, can be particularly corrosive to aluminum. Once the fins are compromised, their ability to transfer heat effectively is reduced, and they can become brittle and break.
- Recommended Cleaners: We recommend using specialized no-rinse foam evaporator coil cleaners. These products are formulated to be safe for HVAC components, effectively lift dirt, and are designed to be rinsed away by the system’s natural condensation cycle. If you absolutely need a substitute, a very mild detergent solution (like dish soap and water) can be used, followed by a careful rinse with a spray bottle of clean water. However, ensure you don’t over-wet electrical components.
What happens if I don’t clean my evaporator coils?
Ignoring HVAC evaporator coil cleaning is like trying to drive a car with a clogged engine filter – it will run, but not well, and not for long. Here’s what can happen:
- Energy Efficiency Loss Statistics: Dirty coils can drastically reduce your system’s efficiency. As we mentioned, studies show that routine coil cleaning can lead to up to 16% efficiency gains. Conversely, neglecting them means your system consumes more energy, leading to those dreaded higher utility bills. Your system will have to consume more energy to do its job, leading to higher utility bills.
- Increased Risk of System Breakdown: The strain of working harder can lead to premature failure of expensive components like the compressor. Dirty coils can also restrict airflow enough to cause ice buildup, which can lead to system shutdowns and potential water damage.
- Poor Indoor Air Quality: Evaporator coils are often moist, making them a prime spot for dust, allergens, and even mold to accumulate. When your system runs, it can then circulate these contaminants throughout your home, negatively impacting indoor air quality and potentially triggering allergies or respiratory issues.
- Potential for Mold Growth: The cool, damp environment of a dirty evaporator coil and drain pan is an ideal breeding ground for mold and mildew. This not only causes musty odors but can also pose health risks.
- NADCA standards on coil cleanliness: The National Air Duct Cleaners Association (NADCA) emphasizes that coil cleaning is a critical component of HVAC system maintenance. Dirty coils restrict airflow, inhibit water removal, and can contribute to excessive humidity, strange smells, microbial growth, and affected building materials. They recommend a four-step process for professional cleaning: Assessment, Visual inspection, Dry cleaning, and Wet cleaning, highlighting the importance of maintaining clean coils for optimal system performance and indoor air quality.
Maximize Your Savings and Comfort
Regular HVAC evaporator coil cleaning is more than just a chore; it’s an investment in your home’s comfort, your wallet, and the longevity of your cooling system. By taking the time to perform this simple DIY maintenance, you’ll reap a wealth of benefits: improved energy efficiency, extended system lifespan, and better indoor air quality for everyone under your roof. There’s a real satisfaction that comes from a successful DIY project, knowing you’ve kept your home running smoothly and saved some money in the process.
However, we also know that sometimes a job requires more than a can of cleaner and a brush. If you encounter issues beyond a simple cleaning, such as extensive mold, persistent freezing, or suspected refrigerant problems, it might be time for professional AC repairs in RI. For complex issues or routine maintenance that requires a deeper dive, trust the experts at Prime Heating & Cooling. We’re proud to serve homeowners across Rhode Island and Massachusetts, including communities like East Greenwich, Johnston, Scituate, Smithfield, Providence, Lincoln, Coventry, Warwick, and Franklin. Our skilled technicians are ready to provide the reliable, energy-efficient solutions you deserve, ensuring your home stays cool and comfortable all season long.


