
What You Need to Know Before You Replace Drain Pipes in House
Knowing when and how to replace drain pipes in a house can save you thousands of dollars – and a lot of headaches. Here’s a quick overview of what’s involved:
Quick Answer: How to Replace Drain Pipes in a House
- Inspect the system with a drain camera to find damage
- Get permits from your local building department
- Choose a method – traditional excavation or trenchless replacement
- Select pipe material – PVC and ABS are the modern standard
- Install and test – check for leaks and proper flow before closing walls
- Prevent future problems – use drain screens, avoid grease, and schedule annual checkups
Drain pipes do not last forever. Whether you are in South Kingstown, Newport, Narragansett, or anywhere else in Rhode Island, aging cast iron or clay pipes eventually corrode, crack, or collapse. When that happens, slow drains and foul odors are just the beginning – ignored drain problems can lead to mold, foundation damage, and sewage backups inside your home.
Homeowners across Rhode Island also frequently ask Google questions like: How do I know if my main drain line needs replacement? Is trenchless sewer replacement worth it? How much disruption should I expect? Those are smart questions, especially in older coastal homes where plumbing, heating, and cooling systems often age at the same time. If you are already comparing plumbing repairs with broader home comfort upgrades, our plumbing services resources and local HVAC support pages can help you plan around the full condition of your home.
The good news? You do not always need a full replacement. Many issues can be fixed with a targeted repair. But knowing the difference – and acting early – is what keeps costs manageable.
I’m Tyler Steiner, CEO and founder of Prime Heating & Cooling, and I’ve spent my career helping Rhode Island homeowners navigate complex home service decisions, including when to replace drain pipes in a house versus when a simple repair will do. From South Kingstown to Newport and Narragansett, our team sees how older New England homes often need both plumbing attention and dependable HVAC service to stay safe, efficient, and comfortable year-round. In the steps below, I’ll walk you through exactly how to approach this project without overspending.

Replace drain pipes in house further reading:
When to Repair vs. Replace Drain Pipes in House
Before we start swinging tools around like a home-improvement TV show, the first question is simple: is repair enough, or is replacement the smarter move?
Drain problems usually start with clues like slow drains, gurgling, sewer smells, recurring backups, or wet spots around the basement floor. In Rhode Island homes, freeze-thaw cycles, shifting soil, and older pipe materials can speed up failure, especially in cast iron, clay, and aging galvanized systems. In service areas like South Kingstown, Newport, and Narragansett, homeowners also commonly search for answers to questions like why do my drains keep backing up? and can old house plumbing affect comfort or indoor air quality? The short answer is yes – especially when leaks create moisture, odors, and mold near HVAC equipment or ductwork.

Common signs you need to replace drain pipes in house
Some warning signs point to a small fix. Others are your plumbing’s way of waving a white flag.
Look for:
- Repeated clogs in the same fixtures
- Slow draining sinks, tubs, or showers throughout the house
- Gurgling sounds when water drains
- Sewage odors indoors or near the yard
- Basement puddles or unexplained wet spots
- Mold growth near walls or flooring
- Water stains around lower cabinets or ceilings below bathrooms
- Visible corrosion, flaking, or rust on exposed drain lines
- Foundation or slab concerns linked to hidden leaks
If the issue keeps coming back after snaking or cleaning, that usually means the pipe itself is damaged, not just blocked. For more on broader warning signs, see our plumbing services resources.
Main causes of drain pipe damage and what Rhode Island homeowners should know
Drain lines fail for a few common reasons, and Rhode Island homes often deal with several at once:
- Corrosion in cast iron or galvanized steel
- Grease, soap, and debris buildup
- Tree root intrusion in buried sewer and drain lines
- Cracks from shifting soil or settling
- Freeze-related stress in vulnerable sections
- Improper flushing of wipes, hygiene products, or food waste
- Old materials like clay or Orangeburg nearing end of life
- Coastal moisture and damp conditions that accelerate deterioration
Cast iron can rot from the inside out. Clay can crack. Roots can sneak in through tiny joints and turn them into a full-blown blockage factory. It is rude, but roots are very committed.
In older homes around Newport and Narragansett, property owners also often ask whether coastal conditions can shorten the life of plumbing and mechanical systems. In many cases, yes – salt air, humidity, and damp basements can be hard on both drain piping and HVAC components, which is why it helps to look at the whole home instead of one isolated symptom.
How to decide between a sectional repair and a full drain replacement
A camera inspection is the deciding factor. Without one, you’re guessing.
Choose a sectional repair when:
- Damage is limited to one short section
- The rest of the line is in solid condition
- There is one isolated leak or crack
- The pipe has not had a long history of repeat problems
Choose full replacement when:
- Multiple sections are failing
- The line is collapsed, badly corroded, or misaligned
- You have recurring leaks or backups in different areas
- The pipe material is outdated and near the end of its lifespan
- Repair costs keep stacking up year after year
According to Angi customer data referenced in industry research, repairs are more common than full replacement, but a significant share of homeowners still end up replacing the main line when damage is widespread.
| Situation | Repair may work | Replacement is usually better |
|---|---|---|
| Single crack or leak | Yes | Sometimes |
| Repeated backups | Sometimes | Yes |
| Root intrusion in one area | Yes | Sometimes |
| Collapsed pipe | No | Yes |
| Aging cast iron throughout house | No | Yes |
| Multiple past repairs | No | Yes |
If you’re weighing your options, our guide to plumbing system replacement can help frame the bigger picture.
How to Replace Drain Pipes in House Step by Step
Once you’ve confirmed replacement is needed, the project usually follows the same basic flow: inspect, plan, permit, replace, test, and restore.
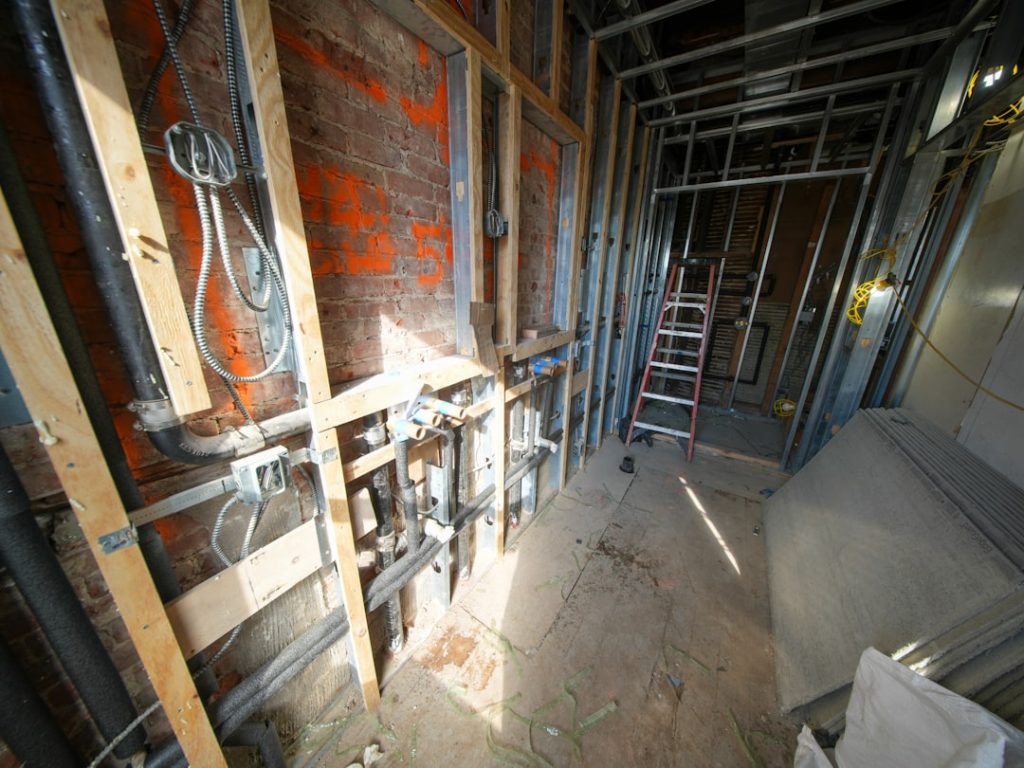
Step 1: Inspect, map the system, and get permits before you replace drain pipes in house
Start with a video camera inspection. This identifies:
- Where the damage is
- How long the affected section is
- Whether roots, corrosion, or collapse are involved
- How deep buried lines are
- Which fixtures connect to the bad run
From there, we map the drain layout and identify access points through basements, crawlspaces, walls, or outdoors. If the job affects sewer connections or structural areas, permits are typically required. In Rhode Island, permitting and inspection rules vary by municipality, so this step should happen before demolition, not after. This is especially important in older homes throughout South Kingstown, Newport, and Narragansett, where plumbing layouts may have been modified over decades and can overlap with furnace rooms, boiler spaces, or mechanical chases.
If you want to troubleshoot symptoms before scheduling bigger work, visit our guide on how to troubleshoot plumbing issues.
Step 2: Choose the right replacement method and pipe material
There are two main replacement methods:
- Traditional excavation or open access
- Trenchless replacement
Traditional replacement is common when drain lines are indoors, under slabs, in walls, or easy to access from a basement. It may involve opening drywall, removing flooring, or breaking concrete in slab-on-grade areas.
Trenchless methods are most useful for buried exterior sewer or drain lines. These may include pipe bursting or lining, depending on the condition of the line. Trenchless work can reduce damage to yards, driveways, and landscaping and may be completed faster in the right conditions. That is one reason homeowners in Rhode Island frequently search for phrases like best sewer line replacement option near me and is trenchless pipe replacement worth it in an older home?
For materials, the most common modern choices are:
- PVC: affordable, corrosion-resistant, smooth interior, long service life
- ABS: durable and impact-resistant, commonly used in drain systems
- Cast iron: quieter and strong, but heavier and more expensive
For most residential drain replacements, PVC or ABS makes the most practical sense. Copper is generally a supply pipe material, not the standard choice for drain-waste-vent piping.
Important installation details matter as much as the pipe itself:
- Proper slope for drainage
- Correct venting
- Secure supports
- Code-compliant cleanouts
- Approved transition couplings when connecting to older pipe
For a useful outside reference on material transitions, see How to replace cast iron plumbing with PVC.
Step 3: Budget the project, prepare for disruption, and understand insurance
We will not get into specific pricing here, but we can say this: access drives cost as much as the pipe problem itself in many homes.
The biggest cost factors are:
- Length of pipe being replaced
- Pipe location
- Whether concrete, flooring, or walls must be opened
- Material used
- Repair versus full replacement
- Traditional excavation versus trenchless method
- Permit and inspection requirements
- Cleanup and finish repairs afterward
Kitchen drain work is usually simpler than basement or under-slab replacement. Basement and crawlspace projects are often more disruptive because of concrete access, confined working conditions, and moisture issues. In many Rhode Island homes, these same spaces also house boilers, furnaces, water heaters, and other HVAC equipment, so careful coordination matters.
Typical disruption may include:
- Temporary water shutoff
- Restricted use of sinks, tubs, or toilets
- Opening walls or ceilings
- Noise, dust, and debris
- Yard disturbance for exterior sewer work
Some jobs take a day. Larger replacements can run several days depending on access, inspections, and restoration work. For related repair and installation help, visit our plumbing installations and repairs.
Insurance usually covers drain damage only when it results from a sudden, accidental event, such as a burst caused by a covered peril. Normal wear and tear, corrosion, age, deferred maintenance, and root intrusion are commonly excluded. Translation: if the pipe slowly gave up over 60 years, your insurer may not be eager to throw a party for it.
Step 4: Test, inspect, and prevent future drain problems after replacement
Once new drain lines are installed, the job is not done until everything is tested.
Final steps should include:
- Flow testing from multiple fixtures
- Leak checks at every joint
- Final code inspection if required
- Camera confirmation for buried lines when needed
- Backfilling or slab patching
- Wall and ceiling restoration
- Site cleanup
To protect the new piping:
- Use drain screens in showers and tubs
- Keep grease and food scraps out of kitchen drains
- Avoid flushing wipes, paper towels, or hygiene products
- Schedule periodic camera inspections for older homes
- Watch for root activity near buried lines
- Address slow drains early before they become backups
Homeowners also commonly ask if replacing damaged drains can help with musty smells or unhealthy indoor conditions. If leaks have been adding moisture behind walls, under floors, or near mechanical systems, the answer is often yes. Our Rhode Island plumbing prevention tips are a good next read if you want to avoid doing this twice.
Cost-Saving Tips and When to Call a Rhode Island Pro
The most affordable drain replacement is usually the one you plan before it becomes an emergency. A clogged kitchen branch line is inconvenient. A sewage backup on a holiday weekend is a character-building experience nobody asked for.

DIY-safe tasks vs jobs that should never be DIY
There are a few homeowner-safe tasks that can help:
- Clearing access to under-sink or basement work areas
- Documenting symptoms and backup patterns
- Learning where shutoffs and cleanouts are located
- Monitoring for odors, wet spots, or repeated slow drains
But actual drain pipe replacement often should not be DIY, especially when it involves:
- Cast iron cutting
- Buried exterior lines
- Trench work
- Sewer tie-ins
- Under-slab piping
- Permit-required DWV changes
- Possible asbestos in older joints or insulation
DIY guides like this PEX repiping overview can be useful for understanding planning, but drain-waste work is less forgiving than many homeowners expect. One bad slope or improper vent and the whole system can turn moody.
For safety and code compliance, call a licensed pro if you suspect collapsed lines, root intrusion, sewer odors, slab leaks, or widespread corrosion. In Rhode Island service areas like South Kingstown, Newport, and Narragansett, this matters even more in older homes where plumbing issues may show up alongside aging heating and cooling equipment.
Final takeaway: replace drain pipes in house the affordable way
If you want to replace drain pipes in house without overspending, the smartest plan is:
- Inspect first
- Repair only if the damage is isolated
- Replace when the system shows widespread failure
- Choose durable modern materials
- Ask about trenchless options for buried lines
- Plan for permits, testing, and cleanup
- Stay proactive with maintenance after the job
For homeowners in Rhode Island, early action is what keeps a manageable plumbing project from becoming a major restoration bill. If you’re seeing slow drains, sewer odors, basement moisture, or repeat backups, do not wait for your house to make the decision for you. And if you are also researching local help for boilers, furnaces, AC systems, or other home comfort issues, it often makes sense to address plumbing and HVAC concerns together so one problem does not keep affecting the other.
For more help, explore our plumbing services and related resources.


