
The Permanent Cooling Upgrade Rhode Island Homeowners Are Choosing
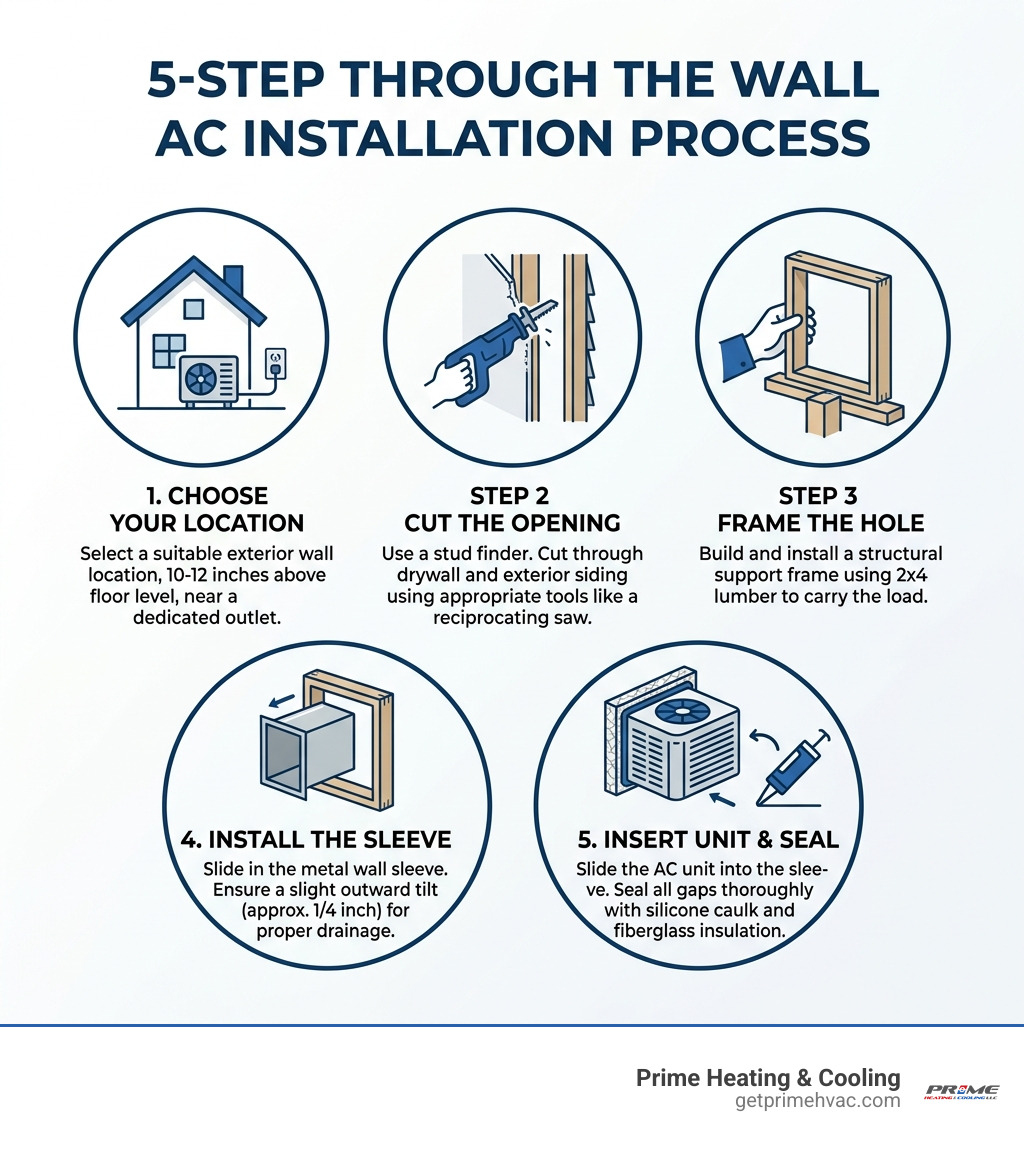
Through the wall AC installation is the process of cutting a permanent opening in an exterior wall, framing it with lumber, inserting a metal sleeve, and sliding an AC unit into that sleeve for a flush, secure fit.
Here is a quick overview of how it works:
- Choose your location – Pick an exterior wall near a dedicated electrical outlet, 10-12 inches above floor level
- Cut the opening – Use a stud finder, then cut through drywall and exterior siding with a reciprocating saw
- Frame the hole – Build a support frame using 2×4 lumber to carry the structural load
- Install the sleeve – Slide in the metal wall sleeve with a slight 1/4-inch outward tilt for drainage
- Insert the unit and seal – Slide the AC into the sleeve, then seal all gaps with silicone caulk and fiberglass insulation
This is not a plug-and-play project. It involves real structural work, and doing it wrong can lead to water damage, energy loss, and costly repairs — especially in coastal New England climates like South Kingstown, Newport, and Narragansett, where humidity and salt air add extra pressure on seals and materials.
The good news? A properly installed through-the-wall unit can deliver reliable cooling for 15 to 20 years and free up every window in the room.
I’m Tyler Steiner, founder of Prime Heating & Cooling and a licensed HVAC professional serving Rhode Island and Massachusetts, with hands-on experience across hundreds of through the wall AC installation projects in homes ranging from historic Newport properties to modern builds in South Kingstown. In this guide, I’ll walk you through exactly how to do this right — from wall prep to final seal.
Through the wall ac installation terms made easy:
- AC Installation in Newport, RI
- Centralized Aircon Installation
- Ductless Mini Split in South Kingstown, RI
Understanding Through the Wall AC Installation Requirements
Before you grab a reciprocating saw and start making confetti out of your drywall, we need to talk about what makes a through the wall ac installation different from other cooling methods. Unlike a portable unit that you can move from room to room, this is a permanent structural modification.

The most critical component is the wall sleeve. Think of the sleeve as a metal “garage” for your air conditioner. It stays in the wall forever, protecting the interior of your home from the elements while providing a sturdy base for the AC unit. Most standard sleeves are approximately 15 inches tall, 26 inches wide, and 16 inches deep. However, sleeves are not universal; you must ensure the sleeve matches the specific chassis of the unit you’ve purchased. Thru-the-Wall Air Conditioners are designed specifically for this recessed setup.
When choosing the right air conditioning unit for your home factors to consider include wall thickness and airflow. A standard residential wall in Rhode Island is typically about 6 inches thick. The AC unit must be able to “breathe” from the back to ensure the compressor doesn’t overheat.
Through the Wall AC Installation vs. Window Units
A common question we hear in areas like Warwick and East Greenwich is: “Can I just put a window AC in the wall?”
The short answer is: No.
Window units are designed to sit in a thin window frame. They have venting louvers on the sides to pull in air. If you shove a window unit into a thick wall, those side vents get blocked. The unit will suffocate, overheat, and likely die within a single summer.
Through the wall ac installation units are engineered with a “rear-breathing” design. All the intake and exhaust happens through the back of the unit, which is why they work perfectly when recessed. Beyond mechanics, wall units offer superior security and insulation. You don’t have to worry about a burglar popping out a window unit or cold winter drafts whistling through the gaps. Following the steps to a successful AC installation in Smithfield, RI starts with using the correct equipment for the job.
Measuring and Preparing for Your Through the Wall AC Installation
Precision is your best friend here. In our 20 years of experience at Prime Heating & Cooling, we’ve seen many “DIY disasters” where the hole was cut too large, leading to sagging walls.
- BTU Sizing: Don’t just guess. A 10,000 BTU unit is generally sufficient for a 400-450 sq. ft. room. If you go too small, it won’t keep up with a humid Newport July. If you go too large, it will short-cycle and leave the room feeling clammy.
- Stud Finding: Most modern homes have studs spaced 16 inches apart. Since a standard AC unit is 26 inches wide, you will almost certainly have to cut through at least one stud. This is why framing is non-negotiable.
- Wiggle Room: We recommend adding a 1/4-inch buffer to the sleeve dimensions when marking your cut. This “wiggle room” allows you to level the sleeve perfectly even if your cut isn’t laser-straight.
Electrical and Structural Safety Precautions
This is where things get serious. In Rhode Island, local building codes often require a dedicated circuit for high-capacity appliances.
- Voltage Requirements: Most units under 10,000 BTUs run on standard 115V power. However, larger units often require a 230V/208V dedicated line. Plugging a high-voltage unit into a shared bedroom circuit is a recipe for tripped breakers or, worse, electrical fires.
- Structural Integrity: If you are cutting into a load-bearing wall, you cannot simply remove a stud and call it a day. You must install a “header”—a horizontal beam that redistributes the weight of the house around the new opening.
- Utility Check: Always use a stud finder with electrical and plumbing detection. The last thing you want is to hit a gas line or a water pipe while cutting through your siding. If you aren’t 100% confident, professional air conditioning installation is the safest route.
Step-by-Step Guide to a Professional-Grade Installation
Ready to get to work? To do this right, you’ll need a reciprocating saw, a level, a drill, silicone caulk, and some 2×4 lumber. If you’re working with a masonry or brick wall in a historic North Providence neighborhood, you’ll also need a diamond-blade saw or a core drill.

Cutting the Opening and Framing the Wall
Once you’ve marked your spot (ideally 1 to 5 feet off the floor, though we prefer 10-12 inches for better airflow balance), follow these steps:
- The Pilot Hole: Drill a hole through the four corners of your interior marks all the way through to the exterior siding. This ensures your inside and outside holes line up perfectly.
- The Cut: Use a reciprocating saw to cut the interior drywall. Remove the fiberglass insulation (wear gloves and a mask!). Then, head outside and cut through the siding using the pilot holes as your guide.
- The Frame: You need to build a “box” inside the wall using 2×4 lumber. This frame provides the structural support the wall lost when you cut the stud. Ensure the frame is 2.5 inches larger than the sleeve to allow for the wood thickness and leveling. Enhance home comfort with AC installation in Smithfield, RI by ensuring the structural foundation of the unit is rock solid.
Installing the Sleeve and Sealing for Efficiency
Now, slide the metal sleeve into your new wooden frame.
The Golden Rule of Drainage: The sleeve must have a slight 1/4-inch outward tilt. If the sleeve is perfectly level or (heaven forbid) tilted inward, all the condensation from the AC will drain into your wall framing. This leads to rot, mold, and a very expensive repair bill down the road.
Secure the sleeve to the wooden frame using the manufacturer-provided screws. To stay cool this summer with professional AC installation in Smithfield, RI, you must seal the perimeter. Use high-quality silicone caulk on the exterior edges and flashing tape to prevent water from sneaking behind the siding. Inside, fill the gaps between the sleeve and the studs with fiberglass insulation. Avoid high-expansion spray foam, as it can actually warp the metal sleeve and make it impossible to slide the AC unit in.
Final Unit Insertion and Long-Term Maintenance
With the sleeve secure and sealed, it’s time for the “main event.” Carefully slide the AC chassis into the sleeve until it clicks or locks into place. Most units come with weatherstripping to create a tight seal between the unit and the sleeve—don’t skip this, or you’ll lose up to 30% of your cooling efficiency to air leaks!
Once installed, your work isn’t quite done. To keep your unit running for that 15-20 year lifespan:
- Clean the Filter: Do this monthly during the summer. Rhode Island’s pollen and coastal salt can clog filters quickly.
- Check the Drainage: Once a year, ensure the drain holes in the back of the sleeve aren’t clogged with debris or spider webs.
- Professional Tune-ups: Even a through-the-wall unit benefits from a seasonal inspection to check refrigerant levels and coil cleanliness.
At Prime Heating & Cooling, we’ve been helping our neighbors in Johnston, Smithfield, and Lincoln stay comfortable for over two decades. Whether you need a hand with a complex masonry installation or want to upgrade to a ductless mini split, our team is here 24/7 to help.
Ready to reclaim your windows and enjoy permanent, quiet comfort? For the best expert AC installation in Rhode Island, give us a call today. We’ll make sure your through the wall ac installation is handled with the precision and care your home deserves.


