
What You Need to Know Before Your Ductless Mini Split Heat Pump Installation
Ductless mini split heat pump installation is one of the most effective ways to add efficient, flexible heating and cooling to your home — without tearing into walls to run ductwork.
Here’s a quick overview of what the process involves:
- Size your system — Calculate BTUs based on room size, insulation, ceiling height, and climate.
- Choose locations — Select wall positions for the indoor air handler and a clear, level spot for the outdoor condenser.
- Mount the indoor unit — Secure the mounting plate to wall studs, drill a 3-inch hole for the line set, and hang the unit.
- Set up the outdoor unit — Place on a level pad with proper clearance, connect refrigerant lines, and wire a dedicated circuit.
- Vacuum and charge the lines — Evacuate moisture and air from refrigerant lines, then open the service valves.
- Test the system — Run all modes (cool, heat, fan) and check for leaks before finishing up.
Traditional ducted systems can lose more than 30% of their energy through leaky or uninsulated ductwork. Ductless mini splits bypass that problem entirely — and with SEER2 ratings reaching up to 35, they’re among the most efficient home comfort options available today.
That said, installation isn’t entirely straightforward. Refrigerant handling, electrical connections, and local code compliance all add real complexity — especially here in New England, where regulations and weather demands are specific.
I’m Tyler Steiner, CEO and founder of Prime Heating & Cooling, and I’ve guided hundreds of ductless mini split heat pump installations across Rhode Island and Massachusetts. In this guide, I’ll walk you through everything you need to know to get it done right.

Learn more about ductless mini split heat pump installation:
Planning Your Ductless Mini Split Heat Pump Installation
Before we even pick up a drill, we need a solid plan. A ductless mini split heat pump installation is only as good as the preparation behind it. Unlike a window AC that you can just “pop in,” these systems are permanent fixtures of your home.
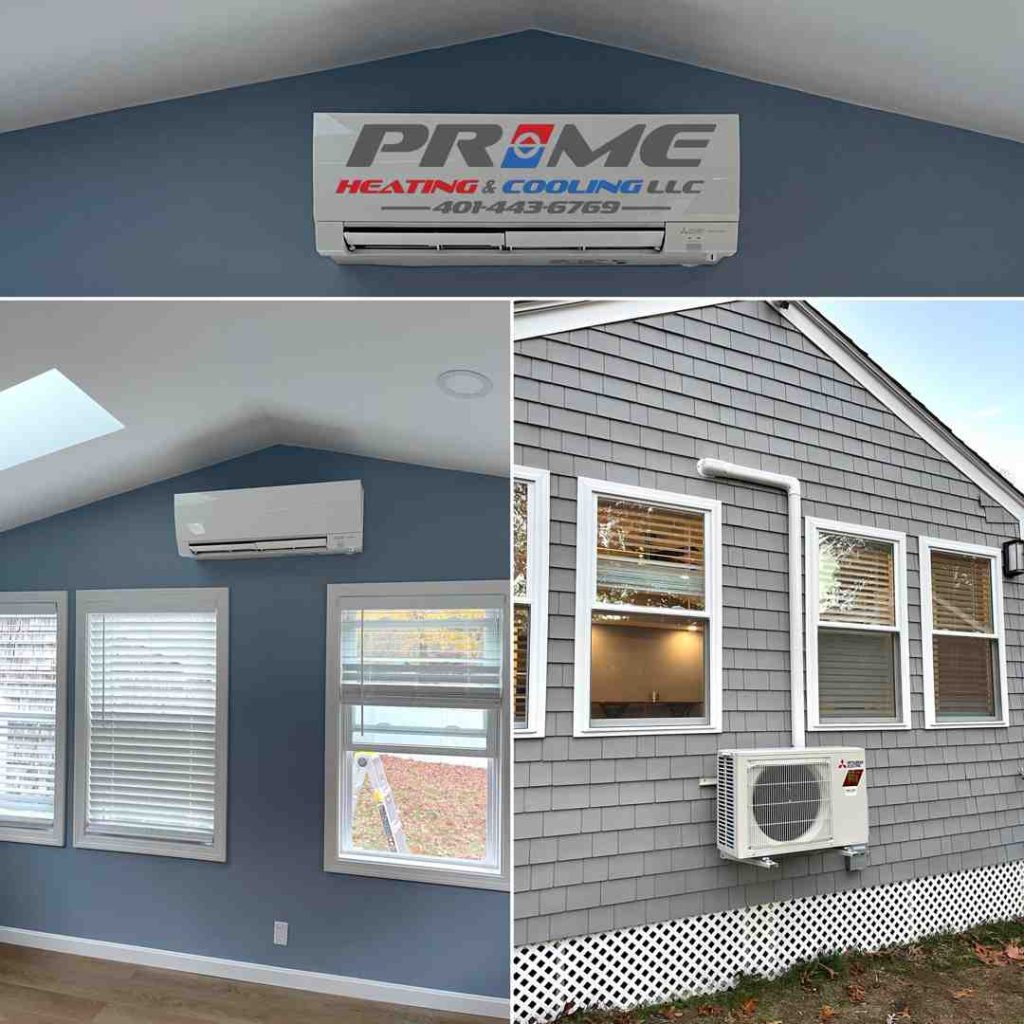
The first step is understanding the two main parts: the indoor air handler (which sits on your wall) and the outdoor condenser (which sits on a pad or bracket outside). These are connected by a “conduit” that houses the power cable, refrigerant tubing, and a condensate drain.
In Rhode Island, we often deal with older homes in places like Providence or East Greenwich where installing new ductwork is nearly impossible. This is where ENERGY STAR® certified mini-split heat pumps shine. They allow us to create “zones,” meaning you can cool your bedroom to 68°F while keeping the living room at a cozy 72°F.
You also need to decide between a single-zone system (one indoor unit for one outdoor unit) and a multi-zone system (one outdoor unit powering up to eight indoor units). For more on the logistics of these decisions, check out this More info about mini split math.

Sizing and Selecting Your System for Ductless Mini Split Heat Pump Installation
Size matters—a lot. If your system is too small, it will run constantly, driving up your electric bill without ever reaching the desired temperature. If it’s too large, it will “short cycle,” turning on and off so frequently that it fails to dehumidify the air, leaving your home feeling clammy.
To get the sizing right, we look at BTU (British Thermal Units) capacity. A general rule of thumb is about 20 BTUs per square foot, but that changes based on:
- Ceiling Height: High ceilings in a historic Scituate farmhouse require more power.
- Insulation: Poorly insulated attics in North Providence mean more heat loss.
- Windows: Large, south-facing windows act like giant heaters in the summer.
- Inverter Technology: Modern systems use inverters to ramp up or down smoothly rather than just switching on/off, which is a game-changer for efficiency.
You can use the ENERGY STAR Home Improvement Savings tool to see how much you could save, and for a deeper dive into the technical side, read More info about mastering ductless HVAC.
Choosing the Ideal Location for Indoor and Outdoor Units
Placement isn’t just about aesthetics; it’s about physics.
For the Indoor Unit:
- Mount it at least 7–8 feet high on an exterior wall if possible.
- Ensure there are no obstructions (like curtains or furniture) within 6 inches of the top and sides to allow for proper airflow.
- It must be perfectly level. If it’s tilted, the condensate water won’t drain correctly and will end up running down your wallpaper.
For the Outdoor Unit:
- Place it on a level concrete pad or secure it to the side of the house with heavy-duty brackets.
- Keep it away from areas where snow might drift or fall from the roof—this is crucial for our winters in Smithfield and Johnston.
- Use vibration pads to keep the unit whisper-quiet. You don’t want to hear the compressor humming through the wall while you’re trying to sleep.
For a look at the “sweat equity” involved in these choices, see More info about saving money and sweat.
The Step-by-Step Process of Ductless Mini Split Heat Pump Installation
Now we get to the “how-to” part. Whether we are doing a ductless mini split heat pump installation in a new addition in Warwick or retrofitting a basement in Lincoln, the process follows a very specific sequence to ensure the system lasts its full 20-year lifespan.
Mounting and Connecting the Indoor Air Handler
First, we locate the studs using a high-quality stud finder. The mounting plate needs to be rock-solid because it holds the entire weight of the air handler.
Once the plate is secure, we drill a 3-inch hole through the wall. Here’s a pro tip: drill at a slight downward angle toward the outside. This ensures that gravity helps the condensate drain hose do its job. If the hole is flat or angled inward, you’re inviting water damage.
We then feed the refrigerant lines, the communication cable, and the drain hose through the hole. It’s like threading a needle, but the needle is 3 inches wide and the “thread” is a bundle of copper and wire. For more on how these systems are becoming a staple in local homes, check out More info about Rhode Island installation trends.
Setting Up the Outdoor Condenser and Electrical
The outdoor unit is the heart of the system. It needs plenty of “breathing room”—usually 12 to 20 inches of clearance on all sides—to exchange heat efficiently.
Electrical work is where things get serious. A ductless mini split heat pump installation requires a dedicated 240V circuit. This isn’t something you can just plug into a standard wall outlet. We install an outdoor disconnect box (a “whip”) so the power can be safely cut for maintenance. We also highly recommend surge protection to protect the sensitive inverter boards from New England’s frequent lightning storms and power surges.
| Feature | DIY Installation | Professional Installation |
|---|---|---|
| Initial Cost | Lower (Equipment only) | Higher (Labor + Equipment) |
| Tools Needed | Vacuum pump, manifold gauges, flaring tool, etc. | Included |
| Warranty | Often voided if not installed by a pro | Fully protected |
| Electrical | Risk of fire/code violations | Licensed & Permitted |
| Refrigerant | EPA 608 Certification required to handle | Certified professionals |
| Longevity | Higher risk of leaks/premature failure | Optimized for 20+ years |
Finalizing Refrigerant Lines and System Startup for Ductless Mini Split Heat Pump Installation
This is the most technical part of the job. The copper lines must be “flared” and tightened with a torque wrench to the manufacturer’s exact specifications. If they are too loose, they leak. If they are too tight, the flare can crack.
Once connected, we perform a nitrogen pressure test. We pump the lines up to about 300–500 PSI and let them sit. If the needle on our gauge moves even a hair, we have a leak that needs fixing.
Next is the vacuum process. We use a vacuum pump to pull the lines down to at least 500 microns. This removes all air and moisture. Even a tiny drop of moisture inside a refrigerant line can turn into acid or ice, which will destroy the compressor in a matter of months. Finally, we open the service valves, releasing the pre-charged refrigerant into the lines.
For a complete breakdown of every tiny detail, consult the More info about the ultimate installation checklist.
Professional vs. DIY: Ensuring Longevity and Warranty
You might see “DIY” mini split kits online that claim to be easy for anyone with a screwdriver. While these exist, there are significant risks involved.
- EPA Regulations: It is actually illegal under Section 608 of the Clean Air Act to handle or “release” refrigerant without proper certification.
- Local Permits: Towns like Coventry and North Smithfield require electrical and mechanical permits for these installs. If you ever sell your house, an unpermitted HVAC system can hold up the sale.
- The Warranty Trap: Most top-tier manufacturers will not honor a warranty unless the system was installed by a licensed HVAC contractor. If your DIY unit fails in year two, you’re on the hook for the full cost of the repair.
At Prime Heating & Cooling, we’ve spent two decades perfecting the art of ductless mini split heat pump installation. We handle the permits, the electrical, the refrigerant, and the heavy lifting, ensuring your system is eligible for the maximum rebates—which can sometimes reach up to $10,000 depending on current incentives.
If you’re ready to upgrade your comfort in North Scituate, East Side of Providence, or anywhere in between, we’re here to help. You can learn more about our local services at More info about Rhode Island heating installation.
Maintenance for Long-Term Success
Once your ductless mini split heat pump installation is complete, the work isn’t quite over. These systems are incredibly durable—often lasting 20 years—but they need a little love to stay efficient.
- Clean the Filters: This is the most important thing you can do. Every month, pop the front panel and wash the plastic filters. Dirty filters can reduce efficiency by 20% or more.
- Clear the Outdoor Unit: Keep leaves, tall grass, and snow away from the condenser. It needs to breathe!
- Annual Professional Checkup: Once a year, have a technician come out to check the refrigerant levels, clean the coils, and ensure the drain line isn’t clogged with algae.
By following this guide, you’re well on your way to a more comfortable, energy-efficient home. Whether you’re in Warwick, North Providence, or Lincoln, a ductless system is a smart investment that pays for itself in comfort and savings.


